chilled packaging

How Chilled Packaging is Revolutionizing the Food Delivery Industry

Imagine it’s a sweltering summer day, and you’re craving that delicious sushi or a fresh salad. But here’s the catch: You’re worried it might arrive lukewarm or even worse, spoiled. Well, with the rise of Chilled Packaging, those days are behind us! Just like a trusty old cooler on a family picnic, this innovation keeps our food in tip-top shape. Ready to explore this cool revolution? Let’s dive in!

What is Chilled Packaging?

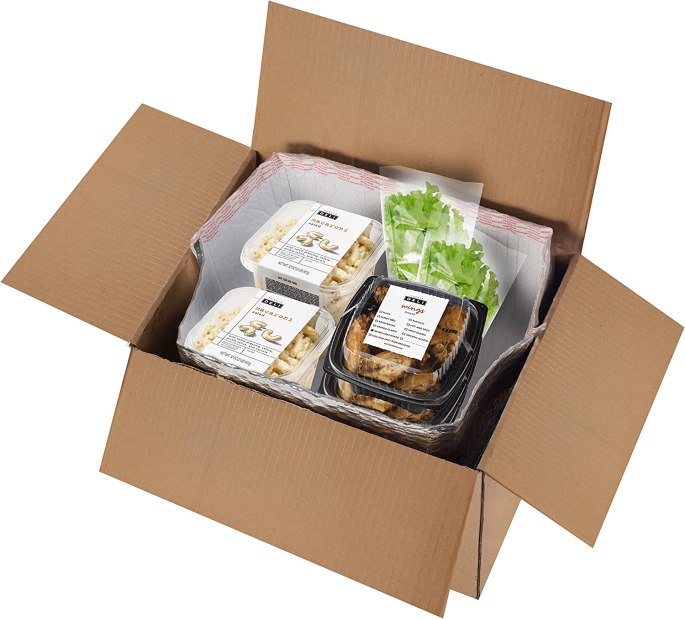
Remember those science experiments in school where we learned about insulation? Chilled packaging is the grown-up, superhero version of those lessons. Essentially, its packaging is designed to maintain a specific temperature range, ensuring that your food remains fresh and safe during transit. Think of it like a mobile refrigerator, keeping your meals perfectly chilled as they journey to your doorstep.

Benefits of Chilled Packaging

Chilled packaging isn’t just a fancy box; it’s the answer to many of the food delivery industry’s pressing concerns:

  • Extended Shelf Life: The lifespan of perishable goods like dairy, meat, and seafood is significantly prolonged.
  • Food Safety: Risks associated with bacteria and spoilage? Consider them drastically reduced!
  • Wider Menu Options: Restaurants can now offer a broader range of dishes without worrying about them spoiling en route.

Impact on Food Quality

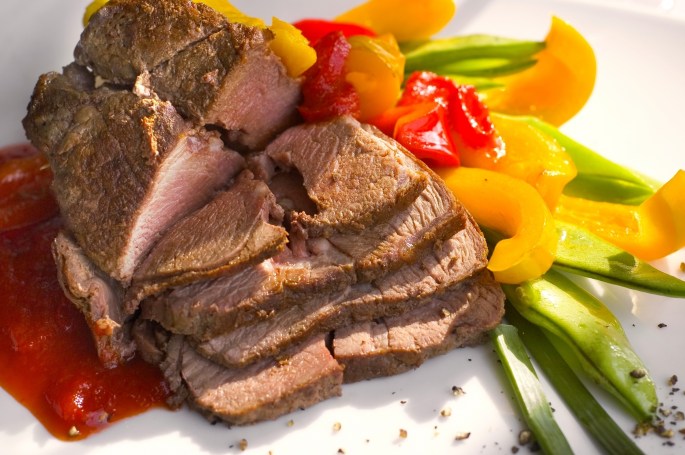
How many times have you received a meal that just didn’t taste “right”? With chilled packaging, the freshness of ingredients is preserved, ensuring that your meal is as delicious as it was intended to be. It’s like having a chef personally deliver your meal straight from the kitchen!

Enhancing Customer Trust

Ever hesitated before ordering seafood online? With Chilled Packaging, restaurants and delivery services can confidently guarantee the quality of their meals, cementing customer trust and encouraging repeat business.

Cost Implications

Adopting new technologies often comes with a price tag. While initial investments in chilled packaging might be higher, the long-term benefits in terms of reduced food wastage, increased customer satisfaction, and expanded menu offerings can lead to better profits.

Environment-Related Issues

The environment is the proverbial “elephant in the room,” so things are not all rosy. While certain refrigerated packing options are environmentally friendly, some may have an impact on carbon emissions. Businesses must strike a balance between efficiency and environmental friendliness.

Prospects for Cold Packaging

The future is bright! Expect ever more effective, affordable, and sustainable chilled packaging alternatives as technology develops. Possibly, very soon, packaging that is as thin as paper and as effective as a mini-fridge will be available!

Limitations and Difficulties

There is no ideal answer. The packaging’s weight, potential increases in transportation costs, and the requirement for ongoing R&D to keep up with changing food safety regulations are some of the obstacles this innovation faces.

How to Choose the Right Packaging

Not all chilled packaging is created equal. Depending on the type of food, duration of delivery, and environmental conditions, businesses need to select the right fit. It’s like picking the perfect outfit – it needs to be functional and fashionable!

The Big Shots

Major food delivery services and businesses are moving quickly to use this game-changing technology. Britwrap and other brands are leading the way and making sure that their customers only get the best.

Use around the world.

Chilled packing is making a name for itself everywhere, from the busy streets of New York to the lively alleys of Bangkok. It is popular everywhere because it promises to be fresh and good, no matter where it goes.

Make Your Own Cold Packaging

For the creative types out there, you can also make your own chilled packaging for personal use or small orders. Creativity and reality work well together.

Conclusion

Chilled packaging is more than just a trend; it’s a revolution, transforming the way we experience food delivery. While there are challenges to tackle, its potential is undeniable. Remember to thank this cool innovation the next time you savor a perfectly fresh meal delivered to your doorstep!

emergency tooth extraction

Emergency tooth extraction when a dental emergency occurs

Managing dental emergencies can be unpleasant and upsetting. In some situations, emergency tooth extraction is a common procedure. In this comprehensive tutorial, we’ll go over all you need to know about this dental procedure. From understanding the need for an urgent extraction to post-operative care, we can assist you with anything. Let’s get going and discover the best way to handle dental urgent.

What does an emergency tooth extraction entail?

An emergency tooth extraction is the removal of a severely decaying or infected tooth that poses a direct threat to your oral health. When no other therapies are available to keep the tooth, it is typically done. This procedure is viewed as a last resort to prevent further problems, such as the spread of an infection or the shifting of surrounding teeth.

When is an emergency tooth extraction necessary?

Emergency tooth extractions are necessary in a number of situations. Common justifications include;

  • If a person has significant dental decay that is endangering the structure of their teeth, tooth extraction may be their only alternative.
  • Trauma or Injury: A tooth may need to be extracted if it is broken or knocked out as a consequence of an accident, sports injury, or fall.
  • Advanced Gum Disease: If gum disease deteriorates to a critical degree, it may harm the underlying tissues of the tooth and necessitate extraction.
  • Impacted wisdom teeth: Wisdom teeth that do not have enough room to erupt normally may cause pain and swelling, requiring wisdom teeth removal surgery.
  • Dental infections: If neglected, infections can spread to the tooth pulp and necessitate prompt treatment in order to prevent systemic effects.

Understanding how to remove a tooth in an emergency

Prior to the extraction, the dentist will do a thorough examination that may include X-rays to ascertain the tooth’s location and root health. The dentist will next administer local anesthetic to the area to numb it, guaranteeing a painless procedure.

Before being pulled, the tooth must first be carefully loosened using specialist dental equipment. Sometimes, separating a tooth into smaller pieces may be necessary for easier removal. After the tooth is extracted, the dentist will apply gauze to the extraction site to halt the bleeding, and you will be given aftercare instructions.

Risks that could arise

Although emergency tooth extraction is a routine dental surgery, there are some risks. These could include:

Pain and Swelling: Small amounts of discomfort and swelling are usual after the extraction. Painkillers and cold compresses can help with these symptoms.

Dry Plug: In rare instances, the blood clot that forms at the extraction site can get dislodged, leading to a condition called a dry socket. It could be uncomfortable and necessitate further care.

Infection: There is little chance of infection at the extraction site. By following post-operative recommendations and maintaining proper dental hygiene, this risk can be minimized.

Aftercare: Keeping Your Mouth Open Following Extraction

Adequate care is essential for a quick recovery following an emergency tooth extraction. Remember the following advice:

  • Gentle rinsing: Do not completely rinse your mouth for the first 24 hours after the procedure. Rinse carefully with a warm saltwater solution to keep the area clean.
  • Avoiding Straws: Straws have the potential to let the blood clot loose, which could lead to problems. It is better to avoid using straws for at least a week.
  • Follow a gentle diet for a few days following the extraction. Eat less of the hot, spicy, or crunchy foods that can irritate the extraction site.

Pain management: Painkillers, both prescribed and over-the-counter, can ease any discomfort. Pay close attention to the dentist’s dosage recommendations.

Steps to open a nail salon

Thinking of opening your nail salon? We can help you with Nail Salon Business Plan with our professional advice. You are right to ride the trend as more and more people frequent nail salons and are willing to spend on having beautiful hands.

But be careful not to start without knowing what to expect. Here are our tips:

Do you have the right training and enough experience?

Before you start, know that it is recommended to have a certificate in nail formation. If this is not your case, and even if you have a degree in manicure, you may find yourself in trouble. Indeed, this job is very technical and requires that you master several things.

First, think about training yourself and getting your certificate. You can be trained in 3 to 4 weeks, and you will be ready to start the business.

But before starting your own business, why not do a few internships to see how a nail salon works? Apart from laying and embellishing the nails, you will have to take care of the other aspects of a business: accounting, inventory management, personnel management, marketing to bring in your customers, loyalty …

You will theoretically see all these aspects during your training, but nothing like the reality on the ground to realize what awaits you. Also, if you are lucky, your boss can give you tips.

Where can you open your salon?

You will need a temporary place to meet many women, including shopping streets and shorts, to purchase the door and pay the rent, but it is evident that. The advantage for your business is that you don’t need a lot of space to cost you as much as a restaurant, for example.

To find the best spot, you can go around the neighborhoods and watch the places where women walk most frequently, for example, in front of bus stops and schools. But see the kind of women passing by.

Your target is women who want beauty and who can become your customers. Therefore, you must do scouting and serious market research to not find yourself without a client. Also, choose a room that is visible to all passers-by with an attractive facade.

The goal is to draw potential clients who like to look around from the outside before entering.

If your budget prevents you from taking a favorite local, why not try negotiating a corner of an existing store? We see more and more corners of all kinds developing, and why not nail prosthetists.

This will allow you to start building a customer base and testing your concept. You will surely have as first customers those of the store that hosts you without seeking them.

How much will it cost you to launch your salon?

Besides the investment to train you and obtain your certificate, the bulk of the investment is for your premises’ rental or purchase. Then, work will have to be done in this living room to make it welcoming and functional.

You’ll also need protection to cover yourself and the company from issues with customers. If you intend to recruit right away, you’ll need to prepare for salaries and employer fees.

Then you must plan a fairly large budget for all the equipment: tables, chairs, stool, lighting … but also to build up the first stock of care products. Casually, you will have a lot of products to have to satisfy all the requests.

If you have the financial means, go all out in terms of content and decoration. You have to make passers-by want to enter your store. Create a cozy living room that attracts attention with lively colors and soft but visible lighting.

Highlight products like varnishes of all colors. This will make you want to test them. You can also display nail art that you have done in pretty frames to show off your skills and model ideas.

Pamper your customers

Before opening your store, don’t forget to think about the services and prices to be charged. Your customers must have a very clear idea of ​​what they are going to pay. Otherwise, they will not dare to enter the store, or if they take the first step, they risk being disappointed and not coming back.

Display the list of services and their prices in the window.

Don’t forget to plan a loyalty program to maintain your customers. Today, it’s common to provide vouchers: the client pays for ten sessions and gets one free. You can also innovate however you want as long as it attracts and keeps your customers.

Regarding the price, you must practice them according to the district where you are installed. The same service can indeed be offered from single to double, depending on the clientele.

But you have to get it right. If you are too expensive, customers will not be able to afford to come to your place. But if you are not expensive enough compared to the women who frequent the neighborhood, you risk being discredited about your work.

If you have competition, their prices can give you an idea of ​​what you can offer without being exactly on the same level.

We hope all of this information will help you open your store. Good luck!

Boiled meats: the flavors of the past up to date

Boiled meats: the flavors of the past up to date

Cooking in broth is suitable for all “tough” cuts, usually on the front of beef or veal, often richer in collagen. This method of preparation makes it possible to tenderize the mutton, to accentuate the flavor by association with the vegetables and the aromatics and finally to make them more digestible.

Meats Cooked In Broth: What To Cook?

There are many pieces of beef used in broth dishes such as pot-au-feu, coarse salt beef, stew  or mironton beef:

  • Lean pieces like scoter, cheek or tip, even “stew” flank steak (under the steak flank).
  • Gelatinous pieces like shank, twin, roost, or tail
  • Fatty or semi-fatty pieces such as tendron, flank, flat ribs, or even the breast.

Veal broth dishes such as blanquette are prepared with a minimum of two meats:

  • Low-fat pieces like the shoulder or the collar
  • Others fatter, sometimes streaky, such as tendron or flank

Many tripe products are suitable for cooking in broth:

the calf’s head, tongue, and cheek (beef or veal).

Some slightly fatty pieces of pork are readily cooked in broth: the shank, the blade, the breast, or even the rack of ribs.

Lamb is less suitable for cooking in broth, except for the leg, which can be prepared in a pot. It’s an English-style boiled leg.

Boiled Meats: Cooking Time

Boiled meats like long cooking over low heat.

Count for a stew of 1 to 2 kilos of meat: 3 to 4 hours.

In the pressure cooker: 30 minutes, then 15 minutes with the vegetables.

For a hotpot: 2 hours to 2:30

For a veal blanquette: 1 hour 30 to 2 hours

Meats For Boiling: Instructions For Use

The boiled meat is cooked “in excess of water” in a liquid more or less flavored with bouquet garni, spices or fine herbs, etc. It is, therefore, essential to provide a sufficient quantity of water (2 to At least 3 liters for 1.5 to 2 kilos of meat).

Unlike meats cooked by concentration (such as roast) or by mixed-method such as braising, boiled cooking is done by expansion in the cooking liquid, which allows meats, vegetables, and herbs to soak up subtly the perfume of each other. If you want to favor the flavor and clarity of the broth, you put the meats in cold water before starting to cook and skim. On the contrary, to keep the meat more flavorful, it should be put in boiling water after or at the same time as the vegetables.

For the pot-au-feu, the classic ingredients, in addition to the meats, are turnips, parsnips, onions, most often cloves, leeks, and celery, without forgetting herbs and bouquet garni. In some regions, it is prepared with three meats: beef, veal, and pork. Finally, the hotpot generally combines a mixture of meats of different species, cabbage, and potatoes.

Boiled Meats: Which Container To Choose?

The king of boiled meats was once the pot, a large cylindrical container, or even the “pot,” the meaning of which is still found in the expressions “pot-au-feu” or “chicken in the pot.” The large pots no longer being used today, we now use casseroles, round or oval, cast iron, or ceramic. For lack of anything better, a “casserole dish” or a large-capacity saucepan may be suitable. The main thing is to provide a container of sufficient capacity to accommodate all the ingredients and a large amount of broth.

Boiled: The Ideal Accessory

The skimmer, this utensil in the shape of a large flat or hollow spoon riddled with small holes, is the essential accessory for broth preparations. Round and flat, it is used to remove the scum on the surface. More ladle-shaped, it allows you to pick up meats and vegetables from the bottom of the pot to reserve or serve.

Chef’s Tips For Properly Boiling Meat

Do not hesitate to be generous in quantities when preparing meats cooked in broth firstly, because a good stew is often even better the day after its preparation. It is then sufficient, before heating it, to degrease it on the surface. But above all, the leftovers of the pot-au-feu can lend itself to many easy and quick recipes to prepare in the days following its preparation. By extension, we used to call “boiled” pieces of beef used in the preparation of a stew and then reused. Meats cooked in a pot-au-feu or a blanquette can, be eaten cold, in salads, but also hot, in hash browns, in meatballs, in stuffings, or even in pie mince … Boiled meats have the advantage. Not to fear new cooking and to keep the aromas of the previous cooking.

To know more about the meat, we recommend another very delicious mutton curry Andhra style recipe. You should try this as well